
Website Migration Guide
If you own or optimize a site for long enough, you'll eventually find yourself staring down the barrel of a website migration. Website migrations can be a difficult technical process to go through, regardless of skill level, and one wrong step could mean severe consequences for your organic search traffic, with long-term effects on your SEO. In this article, we'll go over some key techniques for you to implement before, during and after your new site goes live that will limit the potential negative impact on your SEO efforts.
First, what is a migration? Simply put, it's moving your web files from one domain, server or platform to another. Website owners undertake site migrations for any number of reasons:
- Improving security: This is arguably the number one reason you should undergo a website move. Back in 2014, Google announced that they use site SSL security as a ranking signal: Using HTTPS gets you a boost over pages that don't.
- Moving from subdomain to domain: Google still has trouble attributing ranking signals from a subdomain to its domain. So if you've got your blog hosted at blog.example.com, it's likely that you're not going to see any of the link and authority benefits of having a blog.
- Going global: When launching an international site, it's common to change from a country-specific top-level domain (TLD) to the more widely-accepted .com. If you're creating an international site in multiple languages, remember to use hreflang tags to target the right countries and languages and to avoid duplicate content.
- Rebranding: Maybe you've recently changed a brand or product, changed your business name or revamped your logo. This will most likely result in some major changes to your user experience and site design.
Bear in mind that moving your site to a new domain isn't going to get you out of a penalty. If you have messages in Google Search Console telling you about unnatural links, that penalty will be passed through redirects to your new site. In fact, attempting to migrate your content without resolving penalties will be seen as an attempt to cheat and could hurt you even more.
What to Consider Before Migrating
- Block bot access to your new site until you're ready to take your old one down. If they both are live in parallel you'll be hosting duplicate content, which will damage your new site's ability to rank in search results. There are two ways you can do this. The first is by using your robots.txt file. Prevent crawler access to the entire server using the following robots.txt:
- User-agent:* Disallow:/
The asterisks, or wildcard, sets the Disallow line for all robots. The slash in the Disallow line indicates that the entire domain is inaccessible. To make extra sure spiders don't crawl your page if they somehow find a link, add the "noindex" meta tag. This will block search engine bots from indexing anything after the section. It looks like this:
<meta name="robots" content="noindex">
Note: Make sure you update your robots.txt and meta tag to allow search engine spiders access when your site goes live. It won't get indexed if you don't!
The goal is always the same: to make the migration as smooth as possible, without losing any of the SEO strength built upon the current site.
Impossible? Not if you are careful to watch out for these three things:
- What do you have on the old site?
- What do you have on the new site?
- How can you connect them?
Here are the 3 phases of site migration and what to do during each phase:
Pre-MigrationMigrationPost-Migration Know what you have on the current site. Redirect old site links to new site pages. Double check all redirects. Understand any issues you have on the current site. Make sure your new hosting/site/CMS doesn't have any issues that you have seen on the old site (or new issues). Check the site performance with WooRank Projects. Map out the structure of the current site. Double check the on-page, HTTP status, indexing and canonical details.
A crawler is an indispensable tool to use for site migration. WooRank Site Crawl provides an advanced analysis of all pages that helps you map out pages with issues and required actions across any site.
Whether you are in the pre-migration or post-migration phase, the WooRank site crawler will help you.
This site crawler delivers results under 4 sections:
- On-Page
- HTTP Status
- Indexing
- Canonical

Pre-migration:
- Create a spreadsheet with an inventory of all your current URLs. You can use a crawler like WooRank's Site Crawl , ScreamingFrog or DeepCrawl to find all your URLs. Or, you can export your URLs from your CMS or your Google Analytics account. Remember, that only pages that have received traffic will show up in Analytics. Once you've got a list of all your existing pages, map them to your corresponding new URLs. This will make it much easier to implement your redirects later.
- Create benchmarks of your current traffic. There are a few tools for this step:
- Google Analytics: Monitor your current organic traffic levels. Record your visits and bounce rate to compare against when you launch the new site.
- WooRank Keyword Tool: Record how your legacy homepage ranks for your target keywords. Don't just benchmark one or two; track as many as you can to get the most accurate picture. Start tracking your rankings several weeks before you start your migration so you can tell if any change is part of a larger trend or due to your migration.
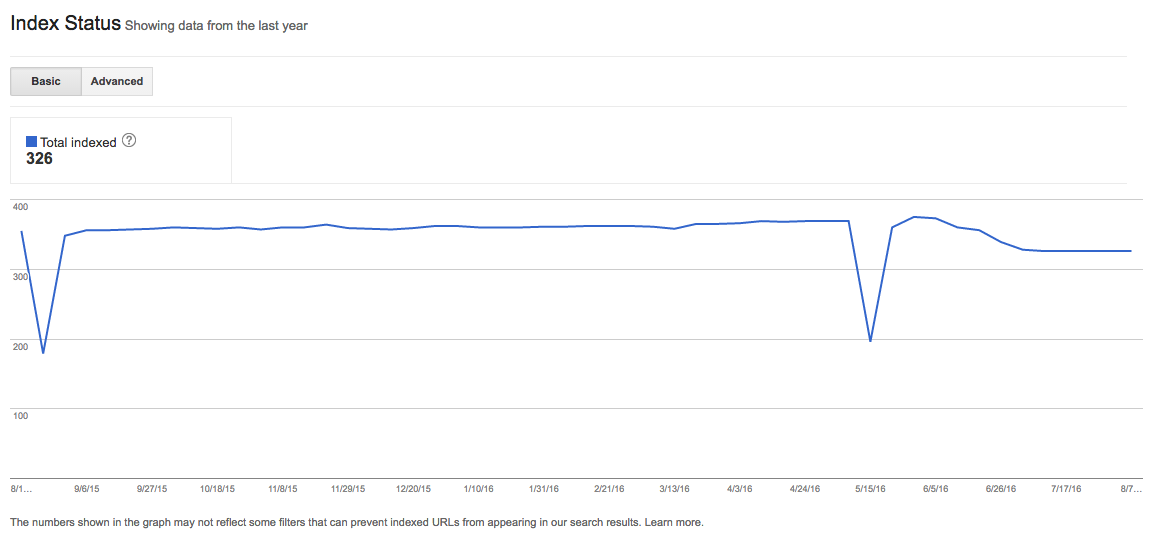
- Google Search Console: Check Google Search Console to track your number of indexed pages. Find this Index Status data in the Google Index section. If the number of indexed pages doesn't recover, that means you have issues with your site's crawlability.
- Create an XML sitemap for your new domain. Sitemaps contain a list every URL in your site, as well as information about their importance, update frequency and when they were last changed. Submit your sitemap to Google Search Console and Bing Webmaster Tools to find any errors. This will help your new pages get indexed more quickly.
- Create an inventory of your existing content, title tags and meta descriptions. This will help you maintain your current rankings in search results or even improve them, if you do some extra keyword research and tweak your content accordingly
When You're Set to Go Live
Once you've built your new site and set the foundation for your migration, it's time to use some tactics to make sure you aren't hosting duplicate content and that you are carrying over as much link juice as you can.
- 301 redirects: Using the spreadsheet you created in step two, write 301 redirects for each old page pointing to its corresponding new URL. This needs to be done very carefully - mapping a redirect to the wrong URL could cause major problems for your new site including lost link juice, domain authority and search rankings. And make sure to redirect every URL. Skipping even a few low priority URLs will result in your new site looking less authoritative to search engines.
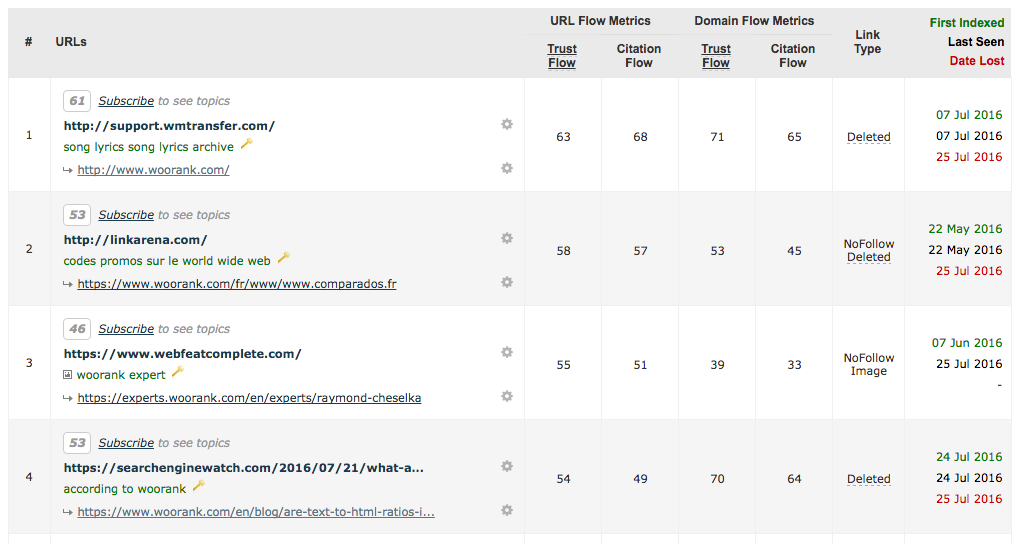
- Update backlinks: While 301 redirects do pass all link equity to your destination URLs, they're still slow and not optimal for user experience. It's to provide people linking to your site with updated URLs. A link analysis tool like Majestic will help you find your most valuable links so you can prioritize outreach. This step has the added benefit of helping you establish relationships with people you know have quality sites and are willing to link to you. Keep their contact information handy for future backlink campaigns.
- Change of address: After you've submitted your new domain to Google Search Console (an important step in getting indexed), set up a change of address for your old URL. Submit the change of address in the Settings menu in the upper right corner of the Search Console. Properly implementing your 301 redirects is very important here; Change of Address doesn't work without them. Note that submitting a change of address does not work when changing the name of a subdomain or changing from HTTP to HTTPS.
After You've Gone Live
Alright, now that you've built yourself a sturdy SEO foundation, it's time for your new site to go live! Your work as an SEO, however, isn't done yet. You need to run tests and monitor key metrics to catch any errors before they cause serious damage to your new site's SEO.
- Robots.txt: Verify that your robots.txt file has been reset to allow search engine user-agents. To allow all bots to access your entire site, set your robots.txt to the following:
- User-agent: * Disallow:
- If you added the "noindex" meta tag to your pages, make sure it's been removed, or the crawlers will index your URL, but not the content.
- Redirects: Using ScreamingFrog, crawl your list of old URLs that you created at the beginning of the process to find any that don't successfully redirect. Make sure the pages only redirect once. Redirect chains make you look bad to search engines and they'll break Google's change of address submission.
- Fetch as Google: Use the Fetch as Google tool in Search Console, under the Crawl area, to simulate a Googlebot crawl of your page. Submit your new URL to test that your homepage and category can be accessed by Googlebot. Use Fetch and Render to see your page as Google sees it. This is a great way to preemptively find any crawl errors you might encounter before they become a serious issue.
- Check meta tags: If you use the rel="canonical" tag to avoid duplicate content, verify that the links point to your new canonical domains. If you have versions of your page in multiple languages, also check your hreflang tags (on your pages or in your sitemap, depending on how you decided to implement them) for any links using the old domain.
Post-migration:
- Audit your new site, ensuring all relevant on-page attributes are up to par.
- Verify your new site does not have issues with thin, blank or duplicate pages.

2. HTTP Status
HTTP status is another factor you will need to check in both pre- and post-migration. Here's what to look for in your WooRank results:
- 5xx errors
- 4xx errors
- 3xx redirect errors
- HTTP/HTTPs inconsistencies
5xx Errors:
- A server returns a 5xx error code when a session times out or the server is overloaded.
- It is essential to test your new servers, ensuring they can withstand high traffic volume. Otherwise, you will end up with a 'down' site every time you experience a traffic spike – a time you definitely don't want your site failing!
4xx Errors:
- A server returns 4xx codes when it receives an invalid request from the client (browser).
- It is important to note which URLs on the current and new sites lead to [404 pages](https://www.woorank.com/en/edu/seo-guides/what-http-status-codes-mean-in-seo#404notfound) and redirect them to the most relevant pages available.
3xx Redirects:
- Watch out for these factors when it comes to 3xx redirects:
- Redirect loops.
- Ensure you are using the correct redirect type.
- Make sure you avoid forming redirect chains. This shouldn't be an issue with a new site, but it is still worth checking.
HTTP/HTTPS inconsistencies:
- HTTP within HTTPS leads to inconsistency across the site and a bad user experience, as the browser will continually alert the user as they browse through the protocols.
3. Indexing
Pre-migration:
- Ensure the new site is de-indexed while you are preparing it. You don't want anyone landing on the new site before it's ready for visitors!
- Review what is currently indexed and what pages are disallowed to get a clear picture of what is on the current site – what is indexed, what is not indexed and what is blocked.
When creating the new site, watch for these factors:
- Non-Indexable Pages: These pages are not being crawled and/or indexed because of their use of NOINDEX X-Robot-Tags, [meta robots tags](https://www.woorank.com/en/edu/seo-guides/meta-robots-tag-seo), robots.txt files or canonical tags. This part of your WooRank results will also identify whether or not each non-indexable page is included in your XML sitemap.
- Disallowed Pages: These pages are disallowed via your site's robots.txt file.
- NOFOLLOW Pages: This section lists internal links (links on pages within your site that point to other pages within your site) that have the NOFOLLOW attribute. The NOFOLLOW attribute prevents pages from passing link juice to the rest of the site, meaning it could be less than fully optimized.
If you have any non-indexable, disallowed or nofollow pages, make sure it is for a good reason. Otherwise, all pages should be indexable, allowed and have the FOLLOW attribute in order to build SEO value.

4. Canonical
This section of your WooRank results is essential for a successful site migration because:
- Canonical tags help search engines know which pages should be considered original – 'canonical' – and which should not.
- Having canonical issues means the tags cannot be accessed, are missing or point to broken URLs. In any case, it is important to address the issue and add the necessary tags to ensure you are not diluting the page's SEO strength.
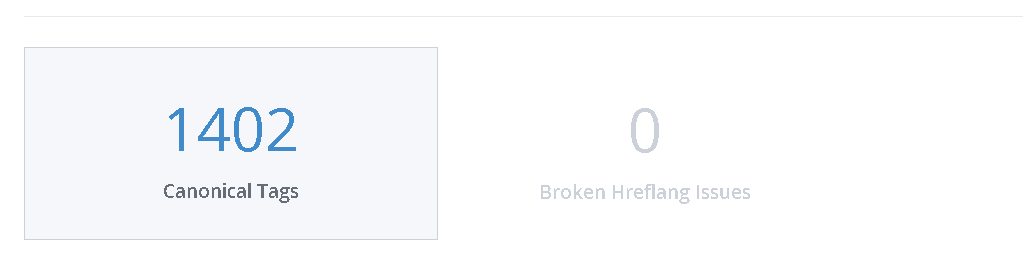
- Broken hreflang issues: When a page's hreflang tag is non-existent or leads to a broken page. The role of [hreflang](https://www.woorank.com/en/edu/seo-guides/hreflang-seo-guide) is to tell search engines which URL belongs to which language and/or geographical audience.
Play the Waiting Game
Like almost everything else in SEO, managing your site migration is an ongoing process. You need to be constantly checking tools like Google Search Console, SERP Checker and Google Analytics to make sure search engines are finding, crawling and indexing your new pages. Occasionally do a Google search for your target keywords to make sure your new URLs are replacing the old ones and that the sitelinks for your top pages (About Us, Categories, Contact Us, etc.) are appearing correctly. Use Search Console to demote irrelevant sitelinks.
Remember, it usually takes some time for the search engines to figure out how things have changed after your migration. It's normal to see a drop in traffic after making such a huge change, so don't jump to any conclusions right away. Monitor and measure your rankings and indexing for a few weeks, generally 3-4, for fluctuations to even out and sudden drops to recover a bit.
Takeaway
Site migration is never an easy process and the complexity will depend on the size and conditions of the sites you are moving from and to.
The key to success is preparation.
If you follow all the above steps before migration, during migration and after migration, you will be able to secure the smoothest and most SEO friendly migration possible.


